Despite all the advances in pump design over the years, we still have to choose how we are going to minimize leakage from our pumps. Based on our team’s observation here at Pye-Barker, there is a split between two camps. The mechanical seal camp and also the packing camp. Both have their merits depending on the circumstances and no doubt you have your own personal preferences.
I’ll deal with mechanical seals another time and focus on packing here.
From DIY options, to custom solutions to even manufacturer supplied packing systems, any pump buyer is faced with an almost bewildering number of choices.
If you want to pack a pump then there are 4 key steps.
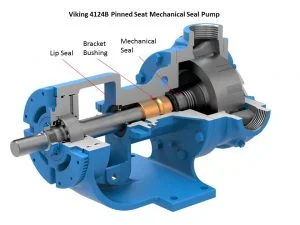
As an authorized service center and supplier of Viking pumps for over 40 years, I want to also share with you a video by Viking on installing packing in your Viking pump.
Choosing the Right Materials.
Since we are in the risk minimization business, we want our clients to maximize up-time, minimize maintenance bills and not spend time and money reinventing the wheel… I believe there are only two sensible choices for pump packing materials. Either use the packing materials provided by the manufacturer that are recommended for your application or use a specialist third party packing supplier. We’ve been using Rainsflo Packing for years on special applications and our clients have been delighted with the results.
Site Preparation.
When replacing the existing packing make sure that the stuffing box is clean. Any debris in there can reduce the quality of the seal and increase the rate of loss from the pump.
Make sure the stuffing box isn’t heavily corroded. If it is, replacing the packing rings won’t give you the seal you desire. You’ll need to replace the worn parts in order to get the same quality seal as you’ve had before.
Correct Installation
Make sure you install your packing as per the manufacturer’s specifications. I won’t get into all of the different ways this can go wrong for you right now. Again, look for a later post on this.
Be very precise about installing your packing. If a component is off, all of your packing might be out of place and again you won’t generate the sealing you are after.
There are a couple of points I’ll address specifically here. Firstly, don’t over tighten your packing. Some product should weep out. If you do, you run the risk of burning the shaft or locking up the pump.
Then. make sure your maintenance team is also aware that packing is meant to weep some product.
Ongoing Monitoring.
During the break in and subsequent monitoring, always follow the manufacturer’s procedures. Again there is nothing worse than doing something twice because you didn’t read the manual. Be sure to allow sufficient run time after each adjustment until you have the system to adapt to your previous adjustment. Once you are happy be sure not to over tighten your packing – remember it should weep. Then continue to follow your packing manufacturer’s guidelines and your packing will have a long life with less downtime.
If you have any questions packing one of your pumps then get in touch with our team on 404-363-6000 or drop us a line sales@pyebarker.com and we will get your questions answered.
In December, I shared with you 3 Air Operated Diaphragm Pump (AODD) installation traps. There are another 3 common installation traps that I see maintenance teams make when installing them.
I thought I’d share these with you here to save you the time and hassle of having to wait until something stops working on your AODD pumps to go and troubleshoot it and fix it.
A lot of plants choose to use AODD pumps when self-priming is required. If you just switch the air flow from off to the required flow rate, you may find that there is not enough time for the fluid to be drawn into the pump to prime it…
This can be avoided by just turning down the compressed air at the regulator for a few seconds – letting the pump work at the reduced pressure – which allows it to draw the fluid into the pump and prime it.
Then you can turn the pump back to full operating speed.
AODD Pump Installation Trap #2: Ensure Your Tubing and Piping Is The Correct Size
The inlet and outlet ports on your pump are selected based on the flow rate you specify. Make sure your inlet and outlet hoses match the pump’s ports.
The main reason is cavitation. Too little flow to the pump and you’ll end up with cavitation which can ruin a pump in no time flat – leading to costly downtime and repairs. Getting the pipes to match the flow rate is worth the fraction of extra investment upfront to avoid the future problems.
Also – I’d recommend using flexible inlet/outlet piping rather than hard plumbing the pump in. As the pump speed increases the vibration increases which elevates the risk of loosening hard plumbed inlets/outlets – creating a risk of leaks forming.
AODD Pump Installation Trap #3: Clear Fluid Line Restrictions During Maintenance.
Honestly, you’d be surprised how often this step gets missed. We get called in on pumps that have broken down and find all sorts of restrictions in the fluid line. We point this out to the client and they mumble something like - “The maintenance team is supposed to look after that.”
If you’ve got a problem with your maintenance team cutting corners, be sure to inspect them – find out who’s doing their job and who isn’t. Also, it’s not hard for a maintenance supervisor to listen for the tell-tale sound of gravel in the pump or flashing around the manifold elbows which indicate cavitation.
Make sure your maintenance team is checking for
Doing your maintenance is like going to the gym for most people… We hate doing it but we feel better afterwards. If you have any questions about your existing air-operated diaphragm pumps then get in touch with our team on 404-363-6000 or drop us a line sales@pyebarker.com and we can get your questions answered.
With the worst of the winter weather about to arrive, I hope you’ve already done your winter preparation. If not – the sooner your compressed air system is taken care of the better.
In the cold weather the condensation in your control lines can freeze. This can result in your compressor controls not working and your in-line air pressure to plummet.
Worse still, your air compressor can be totally shut down if the condensation in your transducers freezes.
Winterizing Your Systems
Hopefully you’ve already winterized your compressed air system – making sure that your weather stripping is working and checking to see that any outdoor piping and equipment has enough weather stripping.
Make sure your air intake openings are protected from increased rain and snow. That’s just extra water for your dryers to deal with once they enter your compressed air system.
Check the insulation in the appropriate buildings. We need to keep that heat in for a reason right?
Maintenance That Can Be Overlooked
Check that your drains are working properly. As temperatures drop, improperly drained condensate can freeze up and clog the filters which can then contaminate your compressed air. If a drain trap is left open somehow, then moisture and particulates can enter your compressed air system.
Change your filters – blocked filters can put a lot of extra stress on your system over the winter – first older filters are less effective at removing all impurities from the air stream which can cause contamination. They can cause unnecessary pressure drops that decrease end use pressure which can in turn increase power consumption by your air compressors. Be sure to change your filters regardless of when they are next due before the start of winter.
There is our quick guide to keeping your compressed air system working during the colder months. We’ll be back to remind you to get ready for summer too.
If you’ve experienced trouble with your compressed air system thanks to the cold weather by all means get in touch with the team at here at Pye-Barker by calling 404-363-6000 or drop us a line sales@pyebarker.com and we’ll get your compressed air system back up to speed and ready for the colder weather ahead.
We all love Air-operated double-diaphragm pumps (AODD) because they are easy to operate and inexpensive to repair. However there are some installation traps that will see your new AODD pump not living up to its potential.
AODD Pump Installation Trap #1: Not Installing Your Inlet Line To The Specified Size and Pressure
All too often we hear about AODD pump owners who haven’t installed the specified air line. Usually the installed line is too small (thankfully almost nobody installs a line too large).
When the line is too small, the pump doesn’t have enough power to operate at peak efficiency. And we provide pumps that will operate at peak efficiency based on your system’s requirements. So install the pump to the specifications provided…
To insure your pump gets the required air pressure, we’d recommend installing an air regulator between the compressed air supply line and your AODD pump. Too much back-pressure and you can stall the pump. Too little back-pressure and the pump won’t supply the desired flow at the desired pressure.
So if you want peak performance from your pump then you need constant pressure from your compressed air system.
AODD Pump Installation Trap #2: Failure To Inspect Sealing Surfaces for Leakage
The most common forms of leakage in an AODD pump are loss of torque over time. Over time your pump materials will stretch – this in turn can cause your sealing surfaces to loosen – creating leak paths.
Make sure you replace all your polytetrafluoroethylene (PTFE) O-rings during services. Once your PTFE O-Rings have been compressed they don’t spring back to their original shape. Which means the connection is more likely to leak. Which in turn means unnecessary downtime while you fix it.
O-Rings and maintenance technicians are a bargain compared to unscheduled downtime for critical downstream applications.
AODD Pump Installation Trap #3: Forgetting To Inspect For Muffler Icing And Restrictions.
AODD pumps are loud. This is why everyone recommends installing mufflers during installation. As the air passes from the pump to the muffler it is subject to rapid temperature changes – muffler exhaust is often below freezing – which can cause icing in humid environments.
Keep an eye out for erratic pump oration, humid inlet air or frost on the outside of the muffler – these are all signs your pump is not operating at peak efficiency.
If you have these symptoms, you can try these quick fixes:
That wraps up the first three air-operated diaphragm pump disasters. We’ll be back with part 2 soon. If you have any questions about your existing air-operated diaphragm pumps then get in touch with our team on 404-363-6000 or drop us a line sales@pyebarker.com and we can get your questions answered.
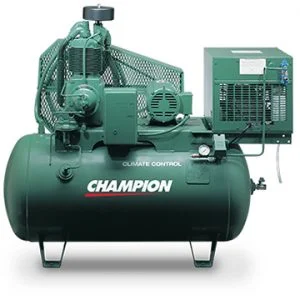
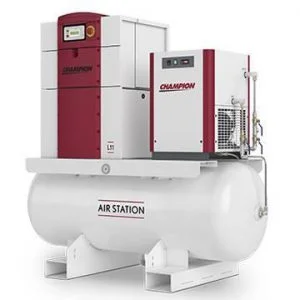
A lot of workshops and ‘less complicated’ compressed air systems owners often face a variation on which compressor option should we take?
The choice is between:
Installing a single big air compressor that can deal with the peak load of the system (as well as future increases in demand)?
Or
Installing two compressors that have the same total output as the larger one but will have a lower power demand while they are unloaded.
To be fair when you buy an air compressor you are guessing or modelling what you think your future demand for compressed air will be over the life of the compressor. Which is not an easy task. Think about the money the National Weather Service spends trying to forecast tomorrow to get it wrong…
There are other options too such as a Variable Speed Drive or modulating inlet air compressors… as well as system design features like storage tanks.
The Best Choice of Air Compressor Depends on Your Duty Cycle
Just in case – duty cycle is the amount of time it needs to be running at full capacity. The rest of the time it is running unloaded. So 60% duty cycle means your air compressor will run at full capacity 60% of the time and be unloaded the remaining 40%.
However it will turn on and off based on the demands of your compressed air appliances. So if you need a series of air tools to run 10 hours a day then the demand is fairly constant. However if you are using your compressed air to propel abrasives, the demand will spike while you’re blasting but the rest of the time your compressed air needs might be minimal.
Both scenarios could see a 60% duty cycle for a given air compressor… but you will find the dynamics of your duty cycle will influence your best choice.
As a rule when you have continuous demand you are better off taking the larger compressor that delivers the volume of air you need at the desired pressure.
However when faced with demand that spikes you might find that running two 25hp compressors instead of purchasing a single 50hp compressor will be more energy efficient. It means you’ll still be able to meet peak demand but you’ll consume less power while your compressors are idle or your compressed air consumption is low enough that a single compressor can fulfill the demand, then the second compressor can provide the additional air when it’s needed.
This sort of lateral thinking is necessary when you are looking to buy your next air compressor(s). Power consumption represents up to 75% of the total cost of ownership of an air compressor while the purchase price is usually 10-15%. It can make sense to invest a little extra up front to slash your power bills.
If you are looking for a collaborative approach to getting a more efficient compressed air system then contact the team at Pye-Barker on 404-363-6000 or drop us a line sales@pyebarker.com and we can help find the right compressor solution for your situation.
If your air compressor comes on for a short burst then turns itself off… then starts cycling again your compressor is short cycling… We’ve just been through this problem with a couple of clients and I feel it’s important to share this with you.
Short Cycling is *almost* always a symptom of a deeper problem in your compressed air system. It is important that your technician finds the root cause – you need to know why and fix it. While your air compressor short cycles, you are paying a 20%-50% premium for compressed air. It becomes imperative for a well-run plant to find that cause and fix it.
On top of the premium you are paying for compressed air, if you haven’t already had them, there are big repair bills on their way if your compressor continues to short cycle, followed by a bigger bill for a new air compressor. The only way to prevent this is to find that root cause of the short cycling and get it fixed.
So I thought I’d share with you 3 of the most common causes of air compressor short cycling.
Lack of an operation time delay: At Pye-Barker, we reckon that that is arguably the most common cause of a short cycle. A proper time delay can keep the system from running due to discharged air still circulating in the system immediately after its operation. It can allow the pressure controller to reset itself naturally while not calling for cooling as opposed to firing another cycle based on high pressure triggers due to compromised condensers.
Pressure or temperature control differential is too small: When the pressure controller’s low pressure differential is set too tight, it can cause the compressor to short cycle. When your temperature and pressure differential is too small you’ll take longer to achieve set point and use more energy use in the process.
A Dirty condenser: A dirty condenser limits your system’s ability to reject heat for regulating temperatures and pressures needed for cooling which can lead to compressor tripping on high head pressure.
Having monitoring systems in place, especially electronic monitoring with data sent to a control room, makes it much easier to spot if any of your compressors are short cycling and act. With a manual maintenance system a short cycling air compressor isn’t necessarily as obvious.
If you spot your air compressor short cycling – get your maintenance crew on to find the underlying cause of the problem post-haste. Or give us a call at 404-363-6000. We would be happy to have one of our technicians come out and help you with your challenge.
Imagine having a raw material that is 78% pure and there is no royalty, lease or other fee associated with extracting it.
Why on earth would you go and buy a refined version of the raw material at $5 to $17 per m3? The only reason I can think of is that you never thought to extract it yourself.
I’m talking about Nitrogen gas. It makes up 78% of the atmosphere. With a simple on-site generation system, you can make your own with the purity you specify, test it for purity, and store it ready for use, at a cost in the range of 40-80% of buying it in from a gas supplier.
No more relying on bottle banks or bulk gas shipments. Just make your own at $3 per m3.
Obviously generating your own nitrogen gas isn’t the right choice in every situation.
When not to make your own.
When you switch from buying to producing nitrogen, you’ll obviously be buying a nitrogen generation system. This means you’ve got more equipment to monitor and maintain. In an ideal situation you’d want to be sure that your existing maintenance team can handle the extra little bit of overhead.
Then in order to make this a really viable transition, you’ll need to be sure that the savings from producing your own Nitrogen pays for the generation system in an acceptable time frame and then puts you squarely ahead on the financial statement. After all, your only ongoing costs for Nitrogen at this point are maintenance and power.
For smaller users of nitrogen, upfront investigation is required to see what your particular capital investment and time to pay off would be.
When to make your own.
If you are using large quantities of gas and can handle the minimal extra overhead of maintaining a nitrogen generation system then you are going to be able to slash your nitrogen costs by at least 40% but possibly all the way up to 80%.
It’s a very simple business case but as always, it’s best to work through this on a case by case basis.
If you need help reviewing if you should switch to Nitrogen generation from supplied gas then give the team at Pye-Barker a call on 404-363-6000 or drop us a line sales@pyebarker.com and we can help guide you to the right answer for you.
Bill Hewlett (Founder of HP)
My favorite story about this idea comes from Federal Express. Just after they’d started they had a problem with the night shift. It was always finishing 2 hours late. Didn’t matter how many people they put on, who they fired, motivation techniques anything… Management was fed up. They needed the night shift to be finished on time.
It took months to figure this out, but eventually they chanced upon the idea of paying a flat rate to the workers on the night shift instead of hourly. Low and behold – the night shift finished two hours early, every night.
Most of our pump customers run preventive maintenance (PM) and condition-based maintenance (CBM) programs. Some are little less formal about it but still have strong maintenance programs.
What varies is the reported return on investment of these programs.
While some of our clients think they have gotten a significant return on their investment, others feel that CBM programs in particular are not delivering a high enough return.
After exploring this with clients I can say that culprit number one is the selection of maintenance metrics.
A bit of backstory – while we do our best to discourage this behavior, a lot of the CBM shutdown and alarm values are based on the equipment manufacturer’s specifications. Those values are not ‘universally correct.’ What’s best varies plant to plant, company to company. Perfect for one is a recipe for disaster for another.
So what we see are shutdowns that shouldn’t be happening. This is causing productivity losses which are counting against the return of a site’s maintenance programs. What’s obviously frustrating is that people ‘just doing their job’ are costing the plant valuable productivity.
This is why performance standards, alarm values and shutdown values need to be determined as part of the predictive maintenance program. Not just taken from an instruction manual.
In order to get return on your PM and CMB programs you need
Then you have a winning maintenance program. Use the manufacturer’s metrics as a baseline but don’t be afraid to adjust them to fit your circumstances.
If you are having any trouble with your pump maintenance programs, please get in touch with us. We can advise you on the likely impacts that changing your maintenance metrics will have on your existing pumps and processes. Give the team at Pye-Barker a call on 404-363-6000 or drop us a line sales@pyebarker.com and we will get your questions answered.
A few weeks ago I wrote about what a good Supply Side Compressed Air Audit should cover (Compressed Air Audit Part 1).
Today I’m going to run you through what should be covered on the demand side.
Auditing and improving the supply side should give you the quick wins and cost savings in order to tackle the demand side – this is where the real money is for a plant manager. This isn’t a once off process – it is something that should be undertaken every two to three years – for the simple reason that technological innovation can often mean that today’s best practices are often obsolete by then.
Waste and ‘Demand side Management’ are two sides of the same coin. Together they create your overall ‘compressed air consumption.’
Both can be managed and reduced and in the case of waste you can always set the goal of reducing it to the point of diminishing returns – it’s cheaper just to create the extra compressed air rather than find and eliminate the next source of waste.
Making the Most of ‘Lowest Effective Pressure.’
This is money for old rope… In most of the plants we audit we can find sections of the compressed air distribution system where the required pressure is far lower than the supplied pressure.
So it becomes a simple case of working in flow control regulators, storage air receivers, intermediate controllers etc. so that you have your different end applications receiving the minimum pressure they need to be effective.
For example: Air tools don’t work twice as efficiently when they have compressed air at twice the pressure they need to work… in fact they probably are less efficient. Doing this is in effect paying a ‘compressed air stupidity tax.’
Personally I don’t like paying more for less result… but maybe that’s just me.
This all starts with effective measurement of compressed air demand and supply to various usage areas in your compressed air system. Then we can go from there.
Leak Inspection Programs
Compressing air is expensive. Letting it escape through leaks is like taking money, ripping it up and flushing it down the toilet. In our experience conducting a leak inspection using ultrasonic leak detection equipment, you’ll quickly identify 20% to 35%. Frequently plugging these leaks corresponds to 10 to 20% of your power.
It will make sense to hold each section accountable for their air use and incentivise them to maintain their infrastructure – including leak identification and repair.
Regular ultrasonic leak detection by an outside party might seem expensive but compared to the power costs of leak – they are really cheap.
Pye-Barker has a team trained to conduct Compressed Air Optimization Audits and do ultra-sonic leak detection. If you are thinking of purchasing additional air compressors in order to increase supply to your existing compressed air system, doing a full compressed air audit will be much cheaper and will almost certainly help you to create the additional supply you need to avoid the purchase. So drop us a line at sales@pyebarker.com or call 404-363-6000 and we walk you through the process at no cost or obligation.

Working towards upgrading your pumping systems is a worthwhile goal. System upgrades can save you a fortune from reduced operating costs, while increasing output and minimizing the cost of repairs and duration of downtime.
Here are the five roadblocks to optimizing your pump system
Roadblock #1: Selecting the Wrong Systems to Try and Upgrade
Especially for your first upgrade project you really want to identify a system that offers fantastic savings potential. It will create positive energy and give the project sponsors reason to continue.
I’d look for pumping systems that have any of the following systems:
Often large, high-maintenance, mission critical systems exhibit many of these problems and can give you a big payoff when you optimize them. Go through all of your systems – create a list that has the any of these symptoms – then we can assess where to start.
Roadblock #2: Improper Assessment.
There are three levels of assessment that need to be conducted in order to determine the payoff for optimizing each system. Most projects often neglect the level 2 and 3 assessment.
Roadblock #3: Collecting the Right Data.
Basically we are looking for the difference between measured and required conditions in our existing systems. We want data on the energy costs, rate of flow and head at a minimum. We will also want data on other components of the existing system, including valves, bypass lines, piping configurations and suction piping that may provide optimization opportunities.
Without the right data we can’t get the right information and without the right information we can’t make the right decision.
Roadblock #4: Getting Your Life-cycle Costing Right.
In essence, optimization projects are about spending money now to reduce costs over time so that you make more profits in the future. To this end, make sure you include the following categories of costs in your life-cycle analysis:
Roadblock #5: Failure to Capture and Explain All The Benefits.
Many times I’ve seen a project where everyone on the team ‘knows they should do it’ but just can’t get the case for it down on paper. Here are a list of a few ways a pump systems optimization will help a plant so that you can assess how a project will pay off for you:
It might seem like a lot of work to get a pump system optimization project ‘up’ with project sponsors but considering the costs of not doing it correctly the first time it is a small price to pay. If you need any help with your pump optimization projects feel free to give us a call on call 404-363-6000 or drop us a line at sales@pyebarker.com and we’ll help you out as best we can.


